202112 - LittleGreen2(CWT9S07)
This manual supports the latest feature version. Differences from the old version are omitted in this manual.
Version change log:https://mastergong.cn/archives/285.html
If you need a new version, please refer to the OTA function.
Housing assembly procedure:https://mastergong.cn/archives/302.html
CLOCK PARAMETERS:
Dimensions: 118 x 48.5 x 28mm (LxWxD)
Digital tube(main display): 4 digits, 0.8 inch, common cathode
Display method: scanning type
Dimming mode: light sensor/timer/manual
Dimming level:8 levels
Power supply interface: typeC 5V (above 1A); There are jacks on the side and rear, both can be used
Consumption: 0.1-0.5W (20mA-100mA), according different brightness average
Networking method: 2.4G WIFI
Time synchronization method: NTP protocol
CLOCK FUNCTION:
Automatic time synchronization with WIFI,2 sets of NTP server addresses built-in(users can modify freely)
Support global time zone, configurable automatic daylight saving time
Support OTA function
Free setting of display content and screen switching time (supports hours, minutes, seconds, milliseconds, month, day, week, lunar calendar, countdown (day), temperature)
Support 12H/24H system
Time separator (:) can be set to flash/constant light
When the first position of the time is 0, Customer can choose whether to display it or not
Time synchronization result (success/failure) can be set whether to display or not
Settable time offset (range -30min to 30min)
Support three dimming modes:light sensitivity/timing/constant, with a total of 8 levels of brightness, and the sensitivity of the light is adjustable
Support 3 sets of alarm, optional cycle, support alarm shutdown by light sensitive , light sensitivity adjustable
The time synchronization cycle can be set (1min/5min/10min/1hour/6hour/1day/1week)
–Sleep trigger: Regular sleep / Light sensitive sleep / Regular + Light sensitive sleep –Hour / half-hour report ringing:report timing and ringing type can be selected - The NTP protocol is preferred for time synchronization. When the NTP port protocol is blocked or the address is invalid, the time can be obtained through HTTP communication - Temperature sensor:18B20, display range:-9.9℃–70.0℃ - Use CR1220 button battery when the clock is powered off and keep RTC running (CWT9S07-L does not have this function) - WEB interface via the browser for clock configuration, not depend on the manufacturer’s server
TIME CALIBRATION TIMING
Power on: The time will be automatically calibrated once every time the power is turned on.
Manual: Short press 2 times for time calibration.
Automatic: Time synchronization according to the set cycle.
注解
If the time synchronization fails, the calibration will be abandoned and will be performed at the next synchronization cycle.
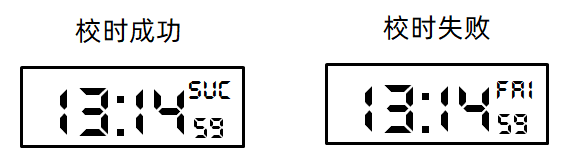
The LED on the back of the clock can be turned on or off in the parameter setting page, the status meaning:
Slow flashing: connecting to the router
Fast flashing: Connecting to the Internet
Steady on: Time synchronization failed
Off: Time synchronization is successful
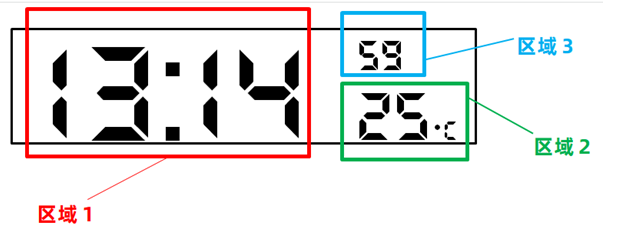
DISPLAY AREA:
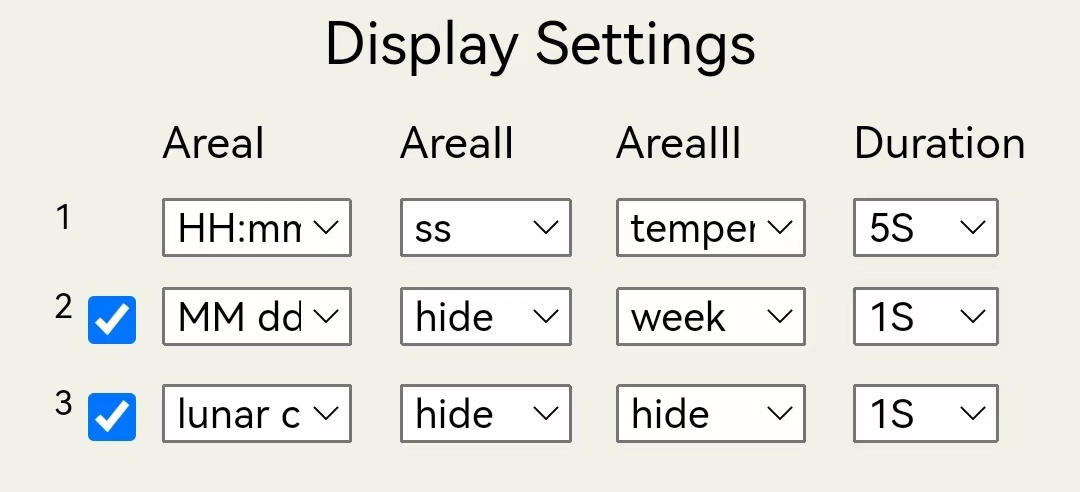
Display mode setting
In the 3 display areas (3 digital tubes), the display content / duration (duration is 1 to 60S) is set according to the following rules.
–Area I: Hours and minutes / Gregorian calendar / Chinese lunar calendar / Countdown (days) / Off. –Area II: Seconds / days / Chinese lunar calendar / day of the week / temperature / milliseconds (1 / 10S) / off. –Area III: Temperature / day / Chinese lunar calendar / second / day of the week / millisecond (1 / 100S) / second.millisecond (1 / 10S) / countdown (days) / off.
NETWORK/TIME ZONE/DAYLIGHT SAVING TIME:
You need to enter configuration mode before setting
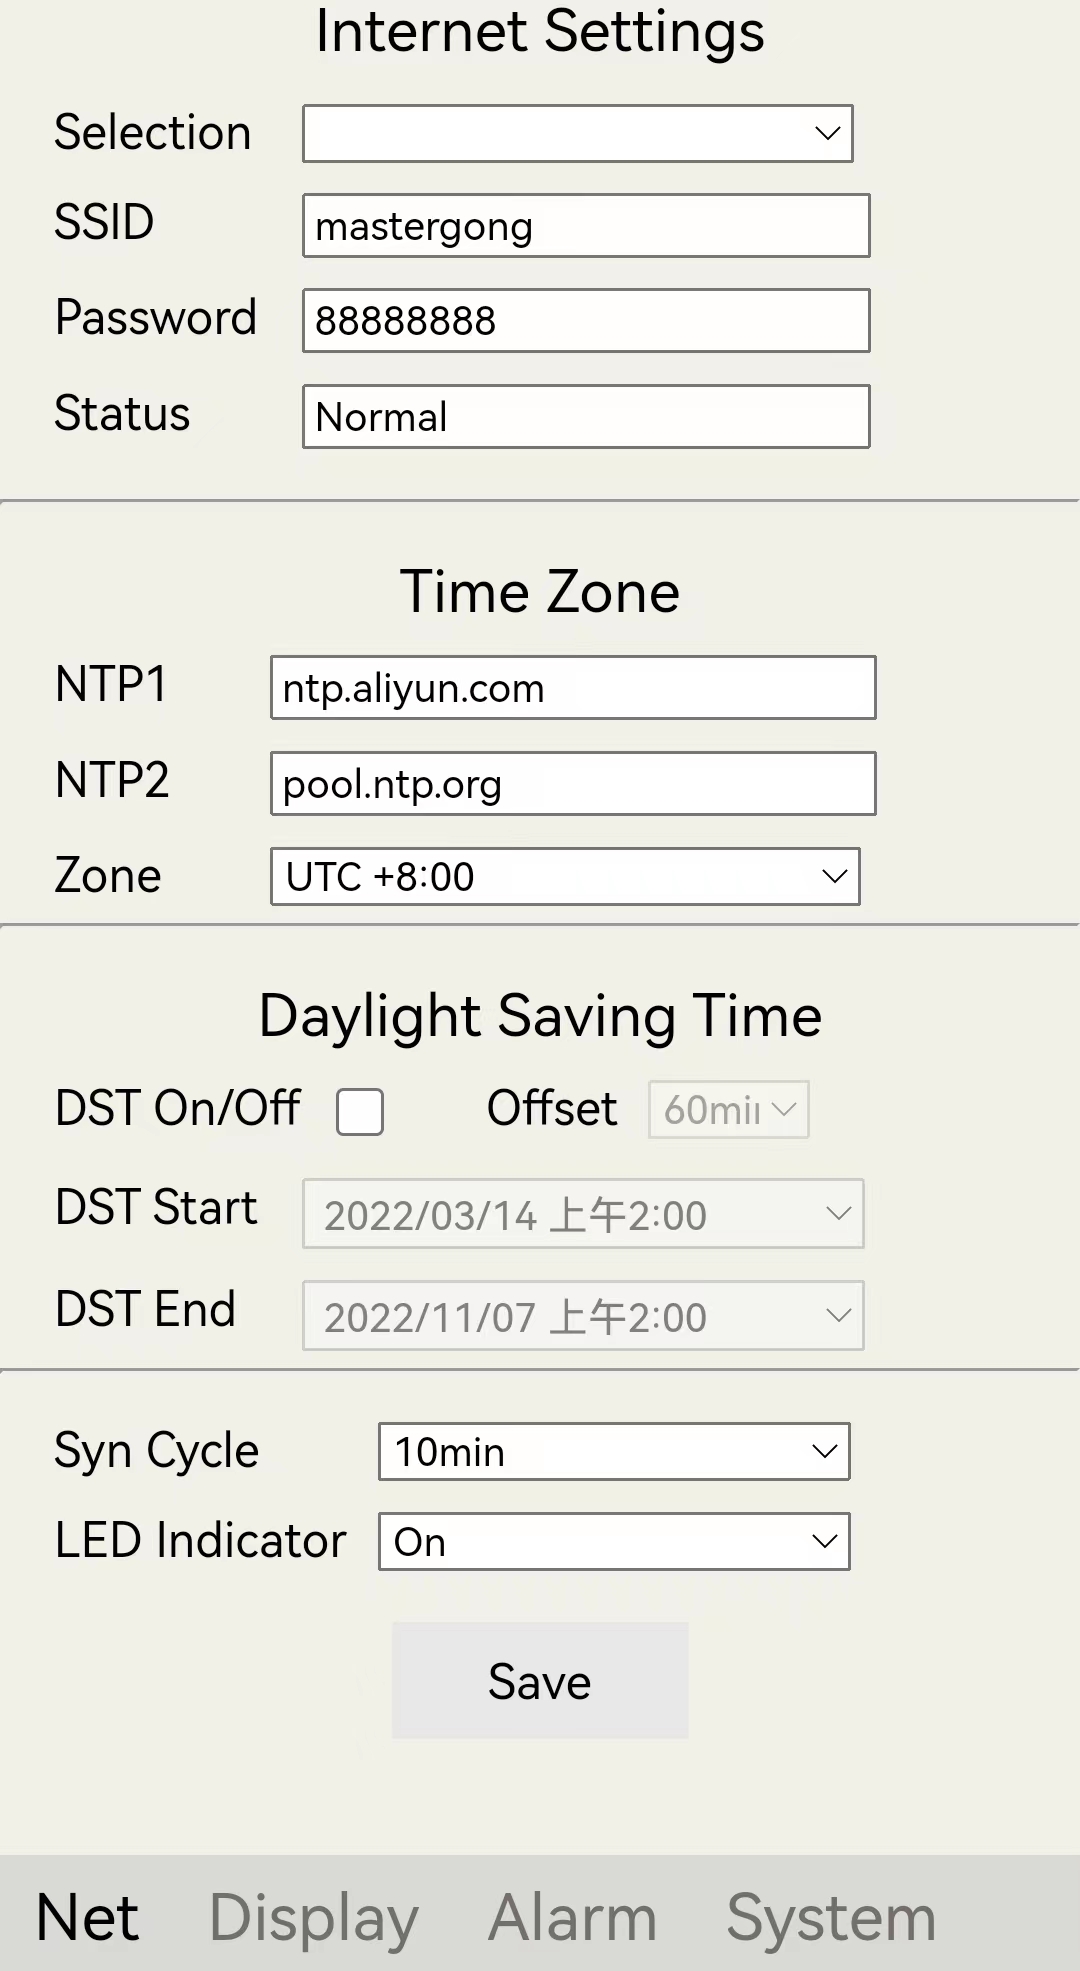
Network / Time Zone / Daylight Saving Time setting page
Network Settings Notes:
① In the WIFI selection drop-down box, select the WIFI to be bound.
② The WIFI name will be filled in automatically.
③ After the setting is saved, the clock needs to be restarted to take effect.
- ④ You can check the last situation in the WIFI status
(“Not configurated”/”Waiting for connection”/”Unable to connect to the router”/”Unable to get NTP”/”Failed to connect to the network”/”Normal”)
DST setting notes:
You need to adjust the time zone of the mobile phone to be the same as the time zone you selected above, otherwise there will be a deviation of several hours between the start and end times of DST.
Time calibration setting notes:
If the calibration cycle <= 10 minutes, use the chip’s internal clock.
LED Display Setting Notes:
The LED refers to the blue light on the rear module. When it is turned on, it flashes to indicate that it is being connected to the Internet. If it is always on, it indicates that the router cannot be connected or fails to synchronize. If it is off, it indicates that the synchronization is successful.
DISPLAY / BRIGHTNESS / SLEEP:
You need to enter configuration mode before setting

Display / brightness / sleep seeting page
Ddisplay area setting notes:
① Display mode: Refer to the display mode setting above.
② First 0: Only for time (example: 02: 35/2: 35), not applicable for day[example: 5-25 / 1025 (without hyphen)]
③ Synchronization result: When the power is turned on or on the the calibration timing, all the calibration results (success: SUC / failure: FAI) are presented in Area III.
- ④ Temperature compensation: Deafault value is ON to exclude the amount of heat generated according to the power consumption of the device.
For technical refit, if the temperature sensor DS18b20 is pulled further, the temperature compensation can be turned off.
Brightness setting notes:
① Fixed brightness: Only one brightness value can be specified.
② Automatic light sensitive: The brightness range can be specified from the minimum to the maximum.
③ Sensitive: Minimum brightness threshold (when automatic light sensitive is specified). Sensitive: Low to high means minimum brightness threshold: small to large.
④ Scheduled adjustment:The scheduled time is set, and the time corresponds to the brightness level, to switch between the two brightness at a fixed time.
Sleep setting notes:
① 3 methods for entering sleep: scheduled sleep / light sensitive sleep / scheduled + light sensitive sleep (means light sensitive sleep for a specified period).
② In the sleeping state, only the display function is stopped (others are normal).
③ You can wake up the display once by short pressing the button once. The clock returns to sleep mode after 30S without any operation.
④ In the display awakening state, you can short press the button again to end this sleep mode.
⑤ Sensitive: Brightness threshold of sleep trigger (only when light sensitive sleep is specified, below threshold: sleep / above threshold: wake). Sensitive: Low to high means sleep trigger brightness threshold: small to large.
ALARM:
You need to enter configuration mode before setting
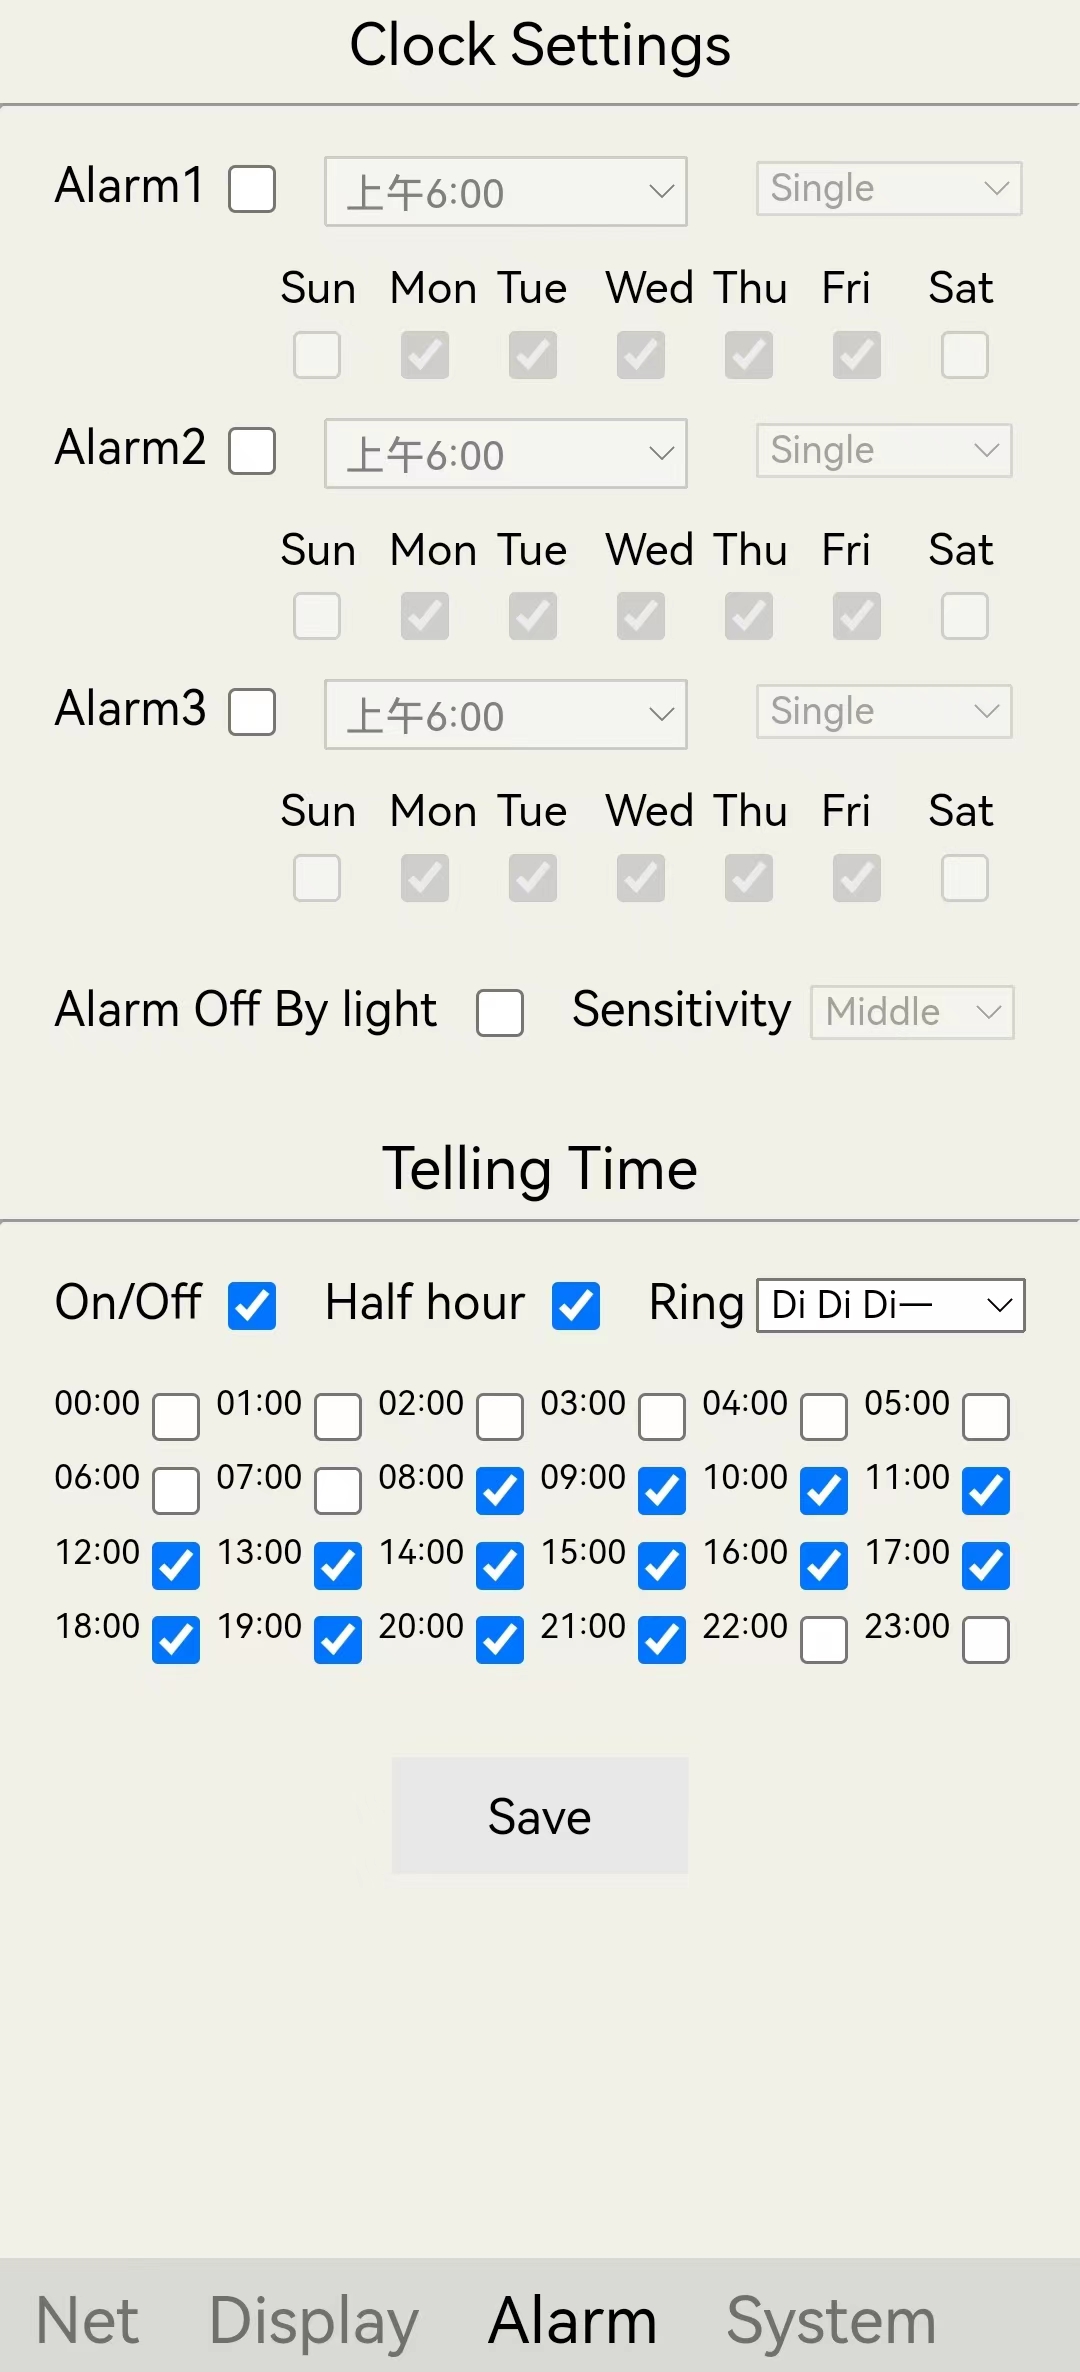
Alarm setting page
Alarm setting notes:
①After the alarm is triggered, press the button to off the ringing. If it is not interrupted, it will automatically stop after 2 minutes.
② to off the alarm via light sensitive , after the alarm rings, you can change the brightness of the environment to turn off the alarm such as covering it with your hand or turning on the light.
③ Sensitivity : It is the threshold value. Sensitivity higher means the threshold smaller, which makes it easier to turn off the alarm. When the light variation is greater than the threshold value for 3S, the alarm will be stopped.
Hour report setting notes:
①The clock will ring when the time is hour/half hour at the set time.
②The half-hour tone is Di, and the hourly tone is selected in dropdown box.
OTA FUNCTION:
You need to enter configuration mode before setting
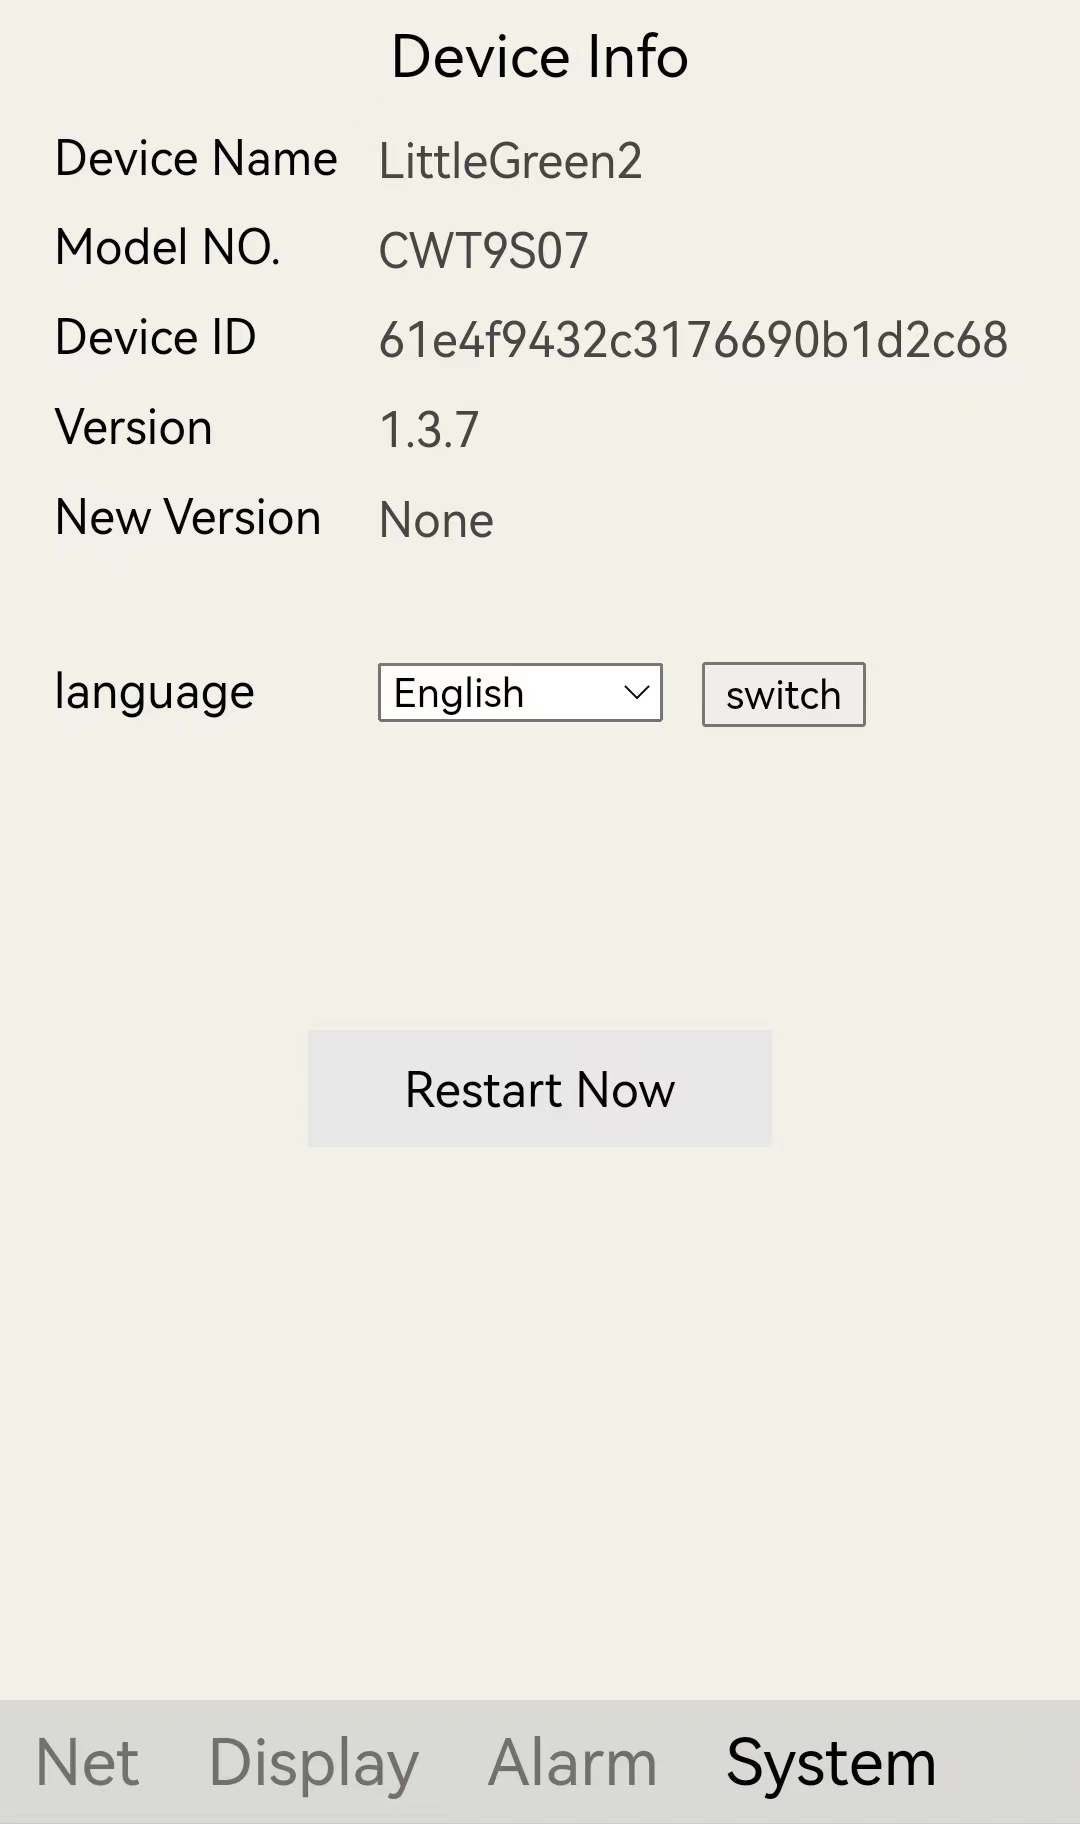
Device info page
Setting notes:
① If you complete the clock parameter settings once, be sure to click “Save” on each page and then click “Restart” on the “system” tab.
② When the number is displayed in “New version”, that means new version is available. Double-click the version number number to start OTA. (It is necessary to keep the power staying on during the version upgrade).
③ The upgrading GIF is | –UP | | UP- | | Update progress percentage | | UPSU (update success) / UPFA (update failure) |
④ If the version upgrade is successful, the clock will restart automatically after | UPSU | is displayed. If the version upgrade fails, | UPFA | will be displayed.Reste the power and then enter the parameter setting page again and re-execute OTA.
⑤ When a new version becomes available, the latest version number will be displayed for a while instead of the boot animation.
提示
If you cannot access the upgrade server outside of China, please use a proxy (VPN).
INTRANET IP ACCESS:
** Once the clock is successfully connected to the router, you can access the clock’s IP to enter the parameter setting page **
Notes:
① Only need to restart the clock when parameters related to WIFI are changed. Other parameter changes only require “save” and do not require a restart.
② It is recommended to bind the clock IP to the MAC address through the router settings so that the IP will not be changed.
③ This feature will be applied from version 2.0.0.
提示
This feature requires user knowledge and operational capabilities of network and router settings. No relevant guidance service is provided because different router brand has different routing settings. If you do not understand this feature, please operate from the parameter setting mode (button long press).
Q & A:
How to check the success / failure of WIFI connection?
The following situation indicates that WIFI was successfully connected or not: ① The LED on the back of the clock. (It is necessary to set the indicate LED on at parameter setting page) ② Enter the parameter setting page and check the “WIFI status” display ③ Short press the button twice, and after a few seconds, ** SUC ** or ** FAI ** will be displayed once in Area III.
Can the clock be powered by a power bank?
Most power banks will automatically power off cause the clock power consumption is low. Be sure the power bank supports small current output.
How to check the current version number?
①The version number will be displayed in the Area Ⅲ when power-on ②In normal display state, short press the button 3 times to display the version number ③Enter the parameter setting page, and it will be displayed on the “Device Info” page
There is a new version in the parameter setting page, but no new version is displayed on the clock device?
When a new version is released, in principle, it will not be actively pushed in batches. You can enter the parameter setting page, copy the device ID and device model and send email to the addess below or leave a message under the blog.
Version change logs:https://mastergong.cn/archives/285.html
Mail : junhui.gong@outlook.com
The network connection fails, how to confirm the reason?
In the parameter setting page, the WIFI status bar will display the last network status. ①”Not configurated”: It is used for the first time after factory reset. ②”Unable to connect to the router”: The router password is incorrect or the router has anti-rubbing network enabled or is not compatible. ③”Unable to get NTP”: The NTP address is invalid or the network has blocked the NTP protocol address. ④”Failed to connect to the network”: Unable to connect to the server. ⑤”Normal”: The device is normal.
The temperature is not accurate, why?
The digital sensor 18b20 is used for temperature measurement. The digital tube body generates heat according to power consumption, and the amount of heat generated differs depending on the room temperature, display brightness, and display content. As a result, the temperature display will be higher than the actual ambient temperature. Currently temperature compensation is built into the software, but not all cases can be covered. How to improve: ① Via brightness adjustment. Use scheduled adjustment or fixed brightness instead of light sensitive. ② Via technical rifit. Turn off temperature compensation. The temperature sensor DS18b20 can be connected from the outside to make it far from the digital tube body. Note: The circuit already has a 10K pull-up resistor. If the line is too long and communication is unstable, you can add another 10K pull-up resistor.
The displayed temperature will be lower than the ambient temperature when the power is not turned on for a long time. As the clock works, the temperature gradually rises and approaches the room temperature value.
What is the difference between model CWT9S07 and CWT9S07-L?
CWT9S07-L has no time memory function(no RTC), and other functions are the same as CWT9S07.
When should the time memory function be used?
A clock with a time memory function keeps the timer even when the power is turned off (effect of CR1220 button battery), so the time is displayed continuously when the power is turned on next time. A clock without a time memory function requires a stable network environment because it must acquire time from the network each time when the power is turned on. There is no problem if you use a clock with no time memory in a place with a good internet environment. For unstable networks or in-vehicle use, we recommend the type with time memory.
How long does time calibration take?
It generally takes 6 to 8S from connecting the router to getting the time. If the internet connection fails, it will be tried 6 more times at most.
When to calculate the time calibration cycle as starting?
The time calibration cycle is calculated from the time the power is turned on. The calibration cycle is set in the parameter setting page.
I have a USB plugged in, why doesn’t the display light up?
The clock module requires an interface that supplies a 5V power supply and a current in excess of 1A. PD and QC protocols are not supported and no pull-down resistors have been added to the CC pin of the circuit. If there is no output voltage, change to the appropriate adapter and charging cable.
** Caution **: If the power supply voltage exceeds 6V, the display chip will be damaged!
Which of the two USB jacks shall be used?
Both can be used. Considering the convenience of the direction in which the charging cable is inserted, two USB jacks are installed.
提示
When ** Err1 ** in Display Area I , that means the energy of the CR1220 coin cell battery is exhausted or the battery connection is bad. Turn off the power supply, remove the battery once then reattach the battery, or use a new battery. When the power is turned on again, the time acquired from the network is automatically displayed.